AUDIO SETUP
PREV: The Master and Point Mixers HOME NEXT: Audio Configuration
The V4 Tracking Engine allows the user to decide how they would like to manage the audio. Audio setups may be as simple as panning between two speakers or as complex as multi-zoned, multi-speaker configurations. To enable the user to achieve the exact desired audio configuration, V4 offers the following software tools. 1. Tracking and Effects Layers The V4 Tracking Engine default view screen features two viewable layers; the Tracking Layer and the Effects Layer. The Layers are extremely flexible in their use, although the:
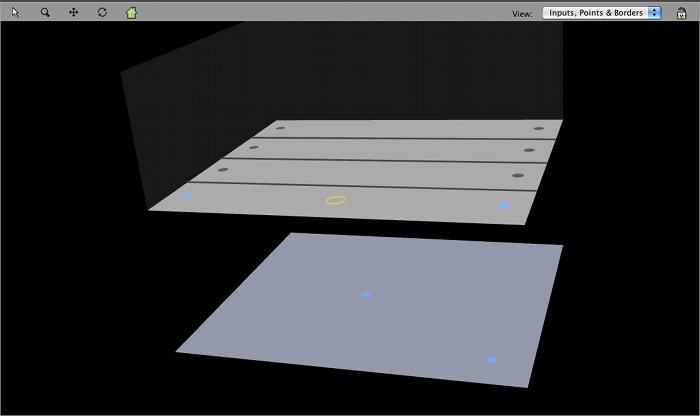
Note however, that any audio source may be moved freely between Layers as desired. 2. Points, Borders, Panlines and Zones By double clicking on the Tracking Layer, the user may choose to place a Point, a Left/Right border, an Upstage/Downstage border or a default Point at the chosen position. Note that borders may only be placed on the Tracking Layer, not on the Effects Layer. Points and borders may be dragged and dropped. Right-clicking on a Point or Border opens an editing window. When no Points are placed on the Tracking Layer, or in any area of the Tracking Layer, it is shown as dark grey. A dark grey area is called a Passive Zone and will have no effect on audio. When a Point is placed on the Tracking Layer, or in any area of the Tracking Layer, the area containing the Point is shown as light grey. A light grey area is called an Active Zone and will have an effect on audio. Placing Left/Right borders on the Tracking Layer will divide the "stage" into (initially Passive) horizontal Zones, stretching the entire width of the stage. These stage-wide zones and are known as panlines. (Note that even before any borders are placed, the Tracking Layer is actually one big panline.) Placing Upstage/Downstage borders in a panline on the Tracking Layer will divide a panline into (initially Passive) Zones. When a Point is initially placed on a panline, it has no active speaker outputs assigned to it and therefore acts as a Mute Point. A Mute Point is shown in red. Right-clicking on a Point gives access to the Point Mixer. The Point Mixer allows the user to assign or edit speaker level and delay relationships which will be applied to an audio input as it approaches the Point or enters an Active Zone containing the Point. When a Point has active (unmuted) speaker outputs assigned to it, it turns blue. Placing one Point in a Passive Zone creates an Active Zone. Any audio source entering the Active Zone will immediately have the assigned audio properties of that Point applied to it, regardless of the distance from the Point. Placing two or more Points in an Active Zone creates a Pan Zone. Any audio source entering the Pan Zone will be panned smoothly between the Points with the assigned audio properties of each Point being applied at levels relative to the distance of the audio source from the Point. The constant power law is applied to all panning. Placing an Upstage/Downstage border between two Points in a Pan Zone will destroy the Pan Zone, replacing it with two Active Zones. An audio source will no longer be moved smoothly between the Points, but will jump from one Point to the other as the border is crossed. Smooth audio movement can be regained at any time by removing the Upstage/Downstage border. A panline may contain any combination of Points, Active, Passive or Pan Zones. 3. Default Position The "Default position" is shown by a yellow circle and is placed by default in the centre of the downstage front panline. This may be moved to any position to suit the requirements of the user. To move the default position, double click anywhere on a Layer and choose "Default Position" from the drop down menu. The default position will move to the new location. Should tracking information from a Tag be lost during a performance, (such as when a performer leaves the stage), the user has the choice of whether the audio will remain at the last known position, or be moved to the default position. To set this choice:
4. Adding inputs to the system To activate a matrix input, go to Audio-> Inputs-> Add Input. This will open the Add Input dialogue box. The Add Input dialogue box can also be accessed by clicking on the "Add" button at the bottom of the input list. The Add Input box allows the user to select a matrix audio input, name it and assign one or two Tags to the input if required. If no Tag is assigned, the input is treated as being a static input. Static inputs may be moved manually by the user or under control of the Effects Engine, but they cannot be controlled and moved automatically by a Tag. 3D icons may be chosen to represent the input graphically on the main screen and the icons may be given distinguishing colours. Use the Layer drop down menu to choose whether the input will be placed on the Tracking Layer or the Effects Layer. Clicking "OK" will close the dialogue box and add the input to the Input List. |
PREV: The Master and Point Mixers HOME NEXT: Audio Configuration